TIPS AND TECHNIQUES for artists on how to photograph your own artworks.
For people who want to prepare digital images
for their website, art competitions and opportunities to promote their art and themselves as an artist
For people who want to prepare digital images
for their website, art competitions and opportunities to promote their art and themselves as an artist
|
On this page you can find:
|
IMAGE MANAGEMENT FOR ARTISTS
The alternative: Plus
|
How to photograph your art
|
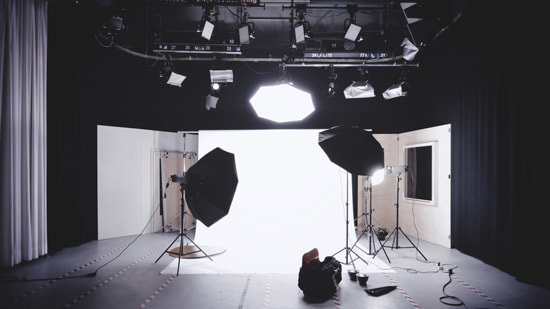
The first time I had my artwork photographed I took it to a professional photographer who was used to photographing artwork. If you are technically/digitally challenged this is what you have to do.
Her studio looked something like this picture. The photos were really great - as was the bill! BUT You don't need a photography studio like this! |
|
|
I decided to try and learn how I could take photos of my own art. Which is when I started learning from fellow artists and collecting links to information about how to do it.
I learned a LOT. This page attempts to pass it on and share it with you. You need to
|
Creating digital images to enter art competitions / open exhibitions
As art competitions have switched to digital entries the quality of the guides have improved - as have the videos. More about this below! |
REFERENCE (GENERAL):
Plus you will find links to reference articles from other sources which are worth a read. It's how well all learn more....
Plus you will find links to reference articles from other sources which are worth a read. It's how well all learn more....
- How to create the best digital photographs of your artwork | Jackson's Art - covers all the basics in an accessible easy to understand way..
- How to photograph your artwork | Artists & Illustrators Magazine - this is a very good article which goes beyond the normal stuff that gets written. Includes comments about the use of lighting and filters. So far it's been shared 24.5k times!
- How to Photograph & Edit Small Paintings | Daily Paintworks by Carol Marine - a priced tutorial from one of the most prolific - and helpful daily painters
- Top Ten Tips for documenting your artwork | Columbus College of Art and Design
- Legal Tips for Hiring Photographers and Other Freelancers | Etsy - When hiring outside help for your Etsy shop, find out how to craft an effective agreement and avoid common disputes and headaches.
- Photographing and Editing Botanical Artwork, Part 1 | Dianne Sutherland
- 4 Steps to Photographing Your Art Like a Professional | Artwork Archive
SOME BASICS for photographing art
Image selection - photograph or scan?
|
SMALL ARTWORK:
If your image is small (less than A4/Letter size) consider scanning if you can have a good quality scanner to hand - see How to scan artwork |
MEDIUM / LARGER ARTWORK
Larger images generally cannot be scanned and hence require a digital photograph and/or scans stitched together. |
Preparation - Set-up
|
USE A GOOD CAMERA FUNCTION
This does not mean buy an expensive camera! You do not need an SLR camera. Many people can get very good quality pictures using their smartphones or tablets - if it has a good camera function. What your camera needs is the following:
|
REFERENCE:
|
PHOTOGRAPH INSIDE - SET-UP YOUR OWN STUDIO
THE ARTWORK NEEDS TO BE:
- NOT reflective, i.e. no wet oil paint!
- Completely FLAT - It may need to be pinned or taped to a neutral backing e.g. a wall - with a neutral coloured tape!
- surrounded by a completely NEUTRAL BACKGROUND e.g. sheets of white foamcore
- well-lit by an EVEN FLAT NEUTRAL LIGHT
- absolutely PARALLEL TO THE CAMERA LENS to avoid distortion
- if photographed indoors - make it VERTICAL i.e. parallel to the camera lens (I pin mine to a sheet of foam core and then focus on making the foam core parallel to the camera)
- if photographed outside - try placing it on a board on the ground or on a slope where the light is flat (see below)
- use the grid lines in the view finder to check whether or not your image is parallel (i.e. edges do not converge or splay)
|
Surroundings
|
For small works you might want to create a small photo studio within a white walled box (you can buy these online)
REFERENCE
|
|
Lighting of the set-up
Do NOT
|
CASE STUDY & TIP - When writing my book, I spent some time observing the light in my home
The best places for even natural light were
REFERENCE:
|
TIP Take your photographs when the natural light is right.
Do NOT plan to take them on a specific day - because that's when the sun will shine and it will be far too bright!
Do NOT plan to take them on a specific day - because that's when the sun will shine and it will be far too bright!
|
PHOTOGRAPH OUTSIDE
For some people it's much easier to go outside to find a neutral environment with even light
|
I go outside with my (automatic digital) camera & art. I find a spot in open shade and prop my painting up with something so it doesn’t fall/blow over, and nothing is in front of it. I make sure my painting is not facing any light source (the sky, or even a window that is reflecting the sky). I sit down and rest my elbows on my knees to steady my camera. Then I zoom in a little since my camera is defaulted to wide-angle (most are). I square the painting in my LCD panel, hold my breath, and take a picture. I take several just to be safe. Carol Marine (FAQs) |
CASE STUDY & TIPS for photographing outside
|
If you are an artist with an expert photographer in the family, you can try what is happening in this photo by Yanny Petters
One further tip - include a greyscale card alongside the artwork so you can use this as a reference when adjusting any colours and tones subsequently |

A botanical artist's husband gets to grips with photography in winter. (With thanks to Yanny Petter)
|
Guidelines for photographing your art
|
Prepare your camera and set-up
|

Invest in a tripod - you won't regret it.
|
How to set-up and photograph the image
Your overall aim is to create an image which reproduces exactly what the artwork looks like in real life - in neutral lighting.
Your overall aim is to create an image which reproduces exactly what the artwork looks like in real life - in neutral lighting.
|
 This is the type of card which you always see on the original professional photos of artwork in museum collections. By including it within the photo you give yourself a reference for adjusting colours and tones later Three dimensional artwork requires:
|
How to photograph art behind glass
|
ALWAYS Photograph artwork BEFORE it is framed - particularly if the frame is glazed and NEVER use flash. Glass creates
|
|
|
To photograph artwork which has been framed:
EITHER
OR hire a professional photographer with a sophisticated lighting set-up and a very good camera he/she can get pics of artwork behind glass - but it will cost you! Not cheap! S/he will:
|
To photograph artwork in exhibitions which is glazed
The most difficult thing about photographing work behind glass (or varnished pieces) is cutting reflections or preventing light from bouncing everywhere. Kristina Corre REFERENCE:
|
Check the accuracy of the digital image to your artwork
This is a HUGE TOPIC which I will write about more in How to Process a Digital File (to follow)
- but for now, the best advice is read the manual for the software you are using.
- but for now, the best advice is read the manual for the software you are using.
|
Download the digital files to your computer and use image software to check the image is truly representative of your artwork. You need to check the accuracy of colours and tones on screen to the actual painting.
If your images look off or odd in any way, try checking the settings on your camera to ensure there is no artificial heightening / distortion of colours and tones. You can also:
|
TIP FOR COMPETITIONS NEVER try to 'improve' your image using software. It's not unknown for selected paintings NOT to be hung if the actual picture is not the same as the image submitted. |
NOTE: I used to use PS Elements for years and found it easy to use while offering more precision than other online apps. (until Adobe "on the rocks" of Apple macOS Catalina) and I had to find an alternative! I now use Affinity Photo - much cheaper and very nearly all the same commands.
CASE STUDY AND TIP for Correcting Colour
You need to lose 'grey paper' - or any other colour of paper which is unlike the original! (this particularly relates to drawings and sketches)
Below are two photographs of a sketch taken 'en plein air'
Below are two photographs of a sketch taken 'en plein air'
- one is the "before" - which had a very marked blue caste due to being taken in deep shade - and
- the second is the one after the Levels were adjusted to get the colour of the background back to a neutral cream
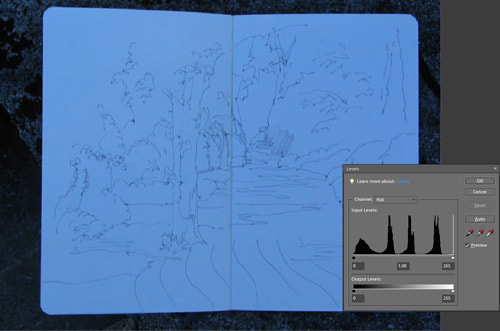
BEFORE - with the levels screen in PS Elements at the time
|
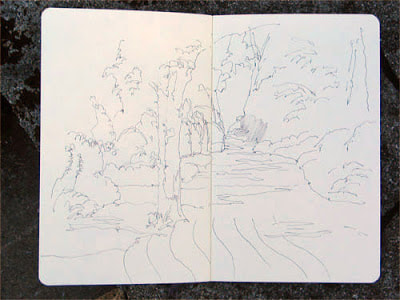
AFTER - the exact same photo after the levels for Red, Green and Blue were adjusted
|
REFERENCE:
- Correcting colour: How to stop your white paper looking grey | Making A Mark
- Correcting colour: another way to stop your white paper looking grey | Making A Mark
VIDEO TIPS on How to photograph your artwork
|
Saatchi Art's guide to taking the best possible photos of your artwork, using simple lighting and camera techniques.
A comprehensive look at how to photograph 3D artwork by Art Prof Clara Lieu
|
How to photograph your art for social media - by Sketchbook Skool
BELOW Photographer Caitlin Lock talks about photographing your artwork at home.
|
ADVERT
How to photograph your art for art competitions
REFER TO ALL THE GUIDELINES ABOVE plus the documents listed below
TIP: Whether you get selected depends on the quality of the image. A bad image of good art is unlikely to be selected.
TIP: Whether you get selected depends on the quality of the image. A bad image of good art is unlikely to be selected.
Guidance from art competitions
|
The Reference articles comprise a list of guidance from three leading art competitions on how to photograph your work for the competition
- plus my own blog post about creating a digital submission. Below I focus on what you need to do to generate you own digital images – which is what most people do.
You need to focus on the essentials to get the best image possible – without photographic or colour distortion. |
REFERENCE:
|
This video (see below) was made by the Royal Academy of Arts for those submitting entries to their Summer Exhibition.
Resize digital image for submission
|
For an art competition, there's often specific parameters for the size of the digital file in terms of pixels or megabytes.
These frequently relate to
|
You want to aim for the biggest image within the defined constraints of file size / format / resolution.
There are a number of resizing image apps online which you can use. For example: PS Elements can be used to provide more precise control. I now use Affinity Photo (much cheaper!) Always make sure then processing an image that you retain the original file and create a new file with a new name. I give mine an accurate 'plain English' name and add a date to make it easier to find and for others to understand what it is. |
|
Resize e.g. in Photoshop Elements (Other online apps also resize images but not all offer the same level of control.)
|
Resize in Affinity Photo: ( see image below)
|
Preparation for digital submission / transfer
|
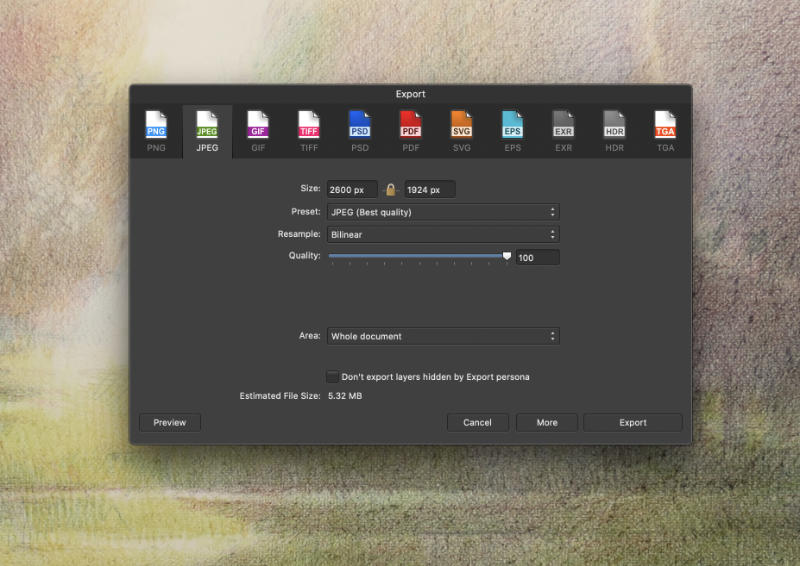
Affinity Photo: Export function (under File) - the screen I use for resizing an image to precise pixels and file format. This is the 58kb version of what was a 5.32MB TIFF file
Digital File Formats and Image Resolution
Which file format to use
This section looks at some of the various file formats
and their different characteristics, pros, cons and best uses by artists
and their different characteristics, pros, cons and best uses by artists

file formats I can use in Affinity Photo software
|
TIFFs (Tagged Image File Format)
|
JPEGs (Joint Photographic Experts Group)
|
|
RAWs (Unprocessed Digital Images/Digital Negatives):
|
REFERENCE:
- Digital file types | National Archives
- Image file formats | Wikipedia
- The 5 Types of Digital Image Files: TIFF, JPEG, GIF, PNG, and Raw Image Files, and When to Use Each One | Ivan Expert
- Demystifying Digital File Format – Art Portfolio Terminology in Agora Gallery’s Glossary of Art Portfolio Terminology - includes explanation of different file formats
What resolution to use
|
The resolution you want to use depends on what's required.
For printing you want as high a resolution as you can go - if the image is secure and you want to print in large format.
To put an image online you should
Note: I come across a lot of artists websites which haven't adjusted the resolution for the web and hence their websites are very slow to load and the file format makes theft and printing of the image very easy) |
REFERENCE
|
ADVERT
For the digitally challenged
|
There is only one effective solution – seek help from others!
Hire a professional to prepare the digital image(s) as required. They may photograph or scan it using a professional set-up. It will cost you money but you should get a great result. Get them to produce
(Don’t send the print quality Tiff file – it's much too big, will "gum up their works" and will only lead to your submission being rejected!) |
Scanning is an excellent option, if you have a scanner that is big enough. Professional scanners use large platen beds to produce images of larger artwork. This will produce excellent results – for a fee
SEE How to scan artwork |
Professional photography of art
|
You need to be aware that when you pay for photographs of your art that the photographer retains the copyright to the photographs UNLESS your contract states otherwise.
|
REFERENCE:
|
The way you're allowed to use images taken by someone else (of yourself, works of art, products, etc) will depend on a variety of conditions, for example whether or not the photographer is paid, location of the jurisdiction, signed agreement / terms & conditions of the sale, et cetera.
Glossary
- Aspect ratio - The aspect ratio of an image is the ratio of its width to its height. It is commonly expressed as two numbers separated by a colon. It describes the shape of an image and the relative proportion of its dimensions. Cameras can change the window through which you view an image for different aspect ratios e.g. 1:1, (a square) 5:4, 6:4, 7:5, 16:9 etc. Some smart cameras on phones can also do this. Each of these relate to conventional shapes for artwork i.e. 5:4 is the ratio for a painting measuring 20 inches x 16 inches.
- Colour caste – an unwanted tint of a particular colour which affects a photograph unevenly
- Crop - elimination of unnecessary parts of the photo to reduce the image to the visible artwork. Always save your cropped image with a different file name and retain the original image.
- Digital image - this is an image which exists in a computer file. It starts as a file created by a digital camera or scanner and can be processed using image software to create an accurate representation of your artwork. It can then be seen on a computer screen or be printed using a digital printer.
- Download - Move your digital file via an electronic connection to your digital device (eg computer)
- Downsize - Digital files can be very big, so you often need to reduce the file size of the digital image by either lowering the resolution and/or reducing the dimensions in terms of the number of pixels.
- DPI (Dots per Inch): the number of dots per inch describes the resolution of the image. The more pixels per inch, the higher the quality of the image - and the more detailed it can be - with sharp edges. You cannot increase the number of dots per inch in a photo - so you need to START with as high a resolution image as possible.
- ISO setting – this measures the sensitivity of the image sensor. Low = better definition. Higher settings are used in low light. Use whatever gives the best result.
- Jpeg (or jpg) – (say ‘Jaypeg’) This is a file format which uses 'lossy compression' to produce an acceptable tradeoff between file size and image quality. It’s not an ideal file format for printing – but it works fine on screens
- Levels - defines the histogram profile of a specific colour within RGB (Red, Blue, Green) and provides the scope within image editing software to move and stretch the brightness levels within an image histogram. The Levels facility can adjust brightness, contrast, and tonal range by specifying the location of complete black, complete white, and midtones in a histogram.
- Pixel - the smallest controllable element of a picture represented on the screen. The higher the resolution the smaller the pixel – creating better definition.
- Platen Glass – the surface on which you lay the image prior to scanning
- Resolution – measured in dots per inch (dpi). The more dots per inch the better the resolution and the more definition within a picture.
- High Resolution - required for printing. Normal minimum resolution for high quality images is 300 dpi
- Low resolution - usually set at around 72 dpi - suitable for showing an image on a computer screen. 72dpi is recommended for web images
- Digital submissions - for open exhibitions often require a 150 dpi minimum which produces a good quality image on good quality screens.
- RGB Levels – digital images are formatted using a Red Green Blue colour system. The precise levels of red, green and blue define the overall colour profile of an image online.
- Tiff – a file format used for printing high quality images (3 character version is Tif)
- Upload - you move your digital file of your artwork to another space eg an art competition platform or another digital device
- Visible image: what you can see of the artwork alone after artwork is matted and framed
Photographing artists with their art
|
TIPS (and images) to follow from somebody (me!) who has been doing this for nearly 15 years.
|
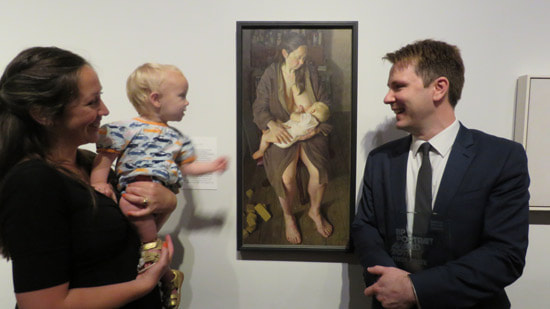
Ben Sullivan, Ginnie, Edie and "Breech!" which won the very prestigious BP Portrait Award competition in 2017. Photo taken by me at the Awards Ceremony.
|